Part 7 - Data Persisting Form via HTML5
Jekyll has demonstrated simplicity and speed in generating a static website (i.e., basic-blog website), and powerful integrative content manipulation (e.g., adding page-navigation and an archive page in the poole-master website via Liquid logic embedded within HTML or Markdown files).
Since Jekyll provides generation of static websites, other prevalent web-technologies that provide solutions to existing problems (e.g., visitor data collection via forms) can still be used normally within the Jekyll build system.
Ergo, this part of the tutorial attempts to explore how common (e.g., HTML <form>, JavaScript, etc.) and newer developing web-technologies (e.g., HTML5 LocalStorage API, (W3Schools 2019)1) can be integrated within the statically generated poole-master website.
To demonstrate this integration, the HTML5 LocalStorage API will be used with a basic single-input form to pre-populate the input if the visitor has previously entered data into the input. This data-persisting form may be useful to webmasters attempting to improve the user-experience of website forms, potentially improving the probability of a visitor completing subsequent forms.
For example, if a visitor partially completes a form but leaves the website (e.g., accidentally, limited time-constraints, etc.), the form can pre-populate previously entered data, hence saving the visitor time and effort. Similarly, when a user attempts to complete a new form, data entered in previous forms can be used for pre-population.
A further benefit of using LocalStorage is that its data is local to the visitor’s computer, hence limiting security and privacy risks.
Creating the Form Webpage
The form page is created as form.html in a similar fashion to the Archive page (i.e., within the root of the website directory), .html is used since Markdown is not needed for this feature.
For simplicity, JavaScript will be included within a <script> tag, eliminating management of a separate JavaScript file, however, for larger programs a separate JavaScript file may be beneficial for file organisation.
The form.html will initially contain a minimal HTML structure, preceded by YAML front-matter providing the layout (for styling) and title:
---
layout: default
title: Form
---

<!DOCTYPE html>
<html>

<head>
  <meta charset="utf-8">
  <title>title</title>

</head>

<body>

  <!-- form elements will go here -->

  <!-- jQuery for brevity -->
  <script src="https://ajax.googleapis.com/ajax/libs/jquery/2.1.4/jquery.min.js"></script>

  <script>
    // form data persistence logic will go here
  </script>
A jQuery <script> is included for brevity, however, LocalStorage can be used with pure JavaScript.
The form was added to the navigation-bar in a similar fashion to the Archive page (i.e., added to nav_pages in _config.yml).
Creating the form
A simple single-input form to collect a visitor’s fullname is used to facilitate focus on using the LocalStorage API to persist the visitor’s previously entered data.
The single-input form structure is as follows:
<form id="the-form">
  Full name:<br>
  <input type="text" id="fullname">
  <br><br>
  <input type="submit" value="Submit">
</form>
The form and text input are given ids for referencing in JavaScript, and a submit input provides a method of listening for the submit user-interaction event.
Adding Form Data Persistence
The code responsible for data persistence is as follows:
console.log("before submit")
printLocalStorageValue();

var fullName = $("#fullname");

// pre-fill input if previously given (i.e., exists in localStorage)
if (localStorage.fullName !== "undefined") {
    fullName.val(localStorage.fullName);
}

var $formInputs;
$("#the-form").submit(function() {
    console.log("fullname v="+fullName.val());

    // locally store value if given
    if (fullName.val() !== null && fullName.val() !== "") {
        localStorage.fullName = fullName.val();
    }

    console.log("after submit")
    printLocalStorageValue();

    // update submit button
    $("#submit-btn").val("submitted")

    // false to avoid refresh
    return false;
});

function printLocalStorageValue() {
    console.log("localStorage fullName="+localStorage.fullName);
}
The jQuery logic using .submit() to listen for the submission event was based on (Stackoverflow 2019)2.
printLocalStorageValue() was used to track the localStorage.fullName value before and after the submit input was clicked.
The text input was referenced as fullName by id via a jQuery CSS-style selector (i.e., #fullname).
If the visitor had previously entered a value that was locally saved (i.e., localStorage.fullName contained a value that wasn’t undefined), then the text input was populated with this value, achieving pre-population of previously entered data.
The form’s submission event was listened and reacted to via .submit() and a callback function. If the visitor had entered data, then the callback function saved the data from the fullName input to the localStorage.fullName enabling the data to persist locally on the visitor’s computer (e.g., data will persist if the page is refreshed)
Testing the form
On visiting the form for the first time, the input won’t be pre-populated. However, upon entering a value, and revisiting (e.g., refresh the page) the form, the previously entered value will pre-populate the input.
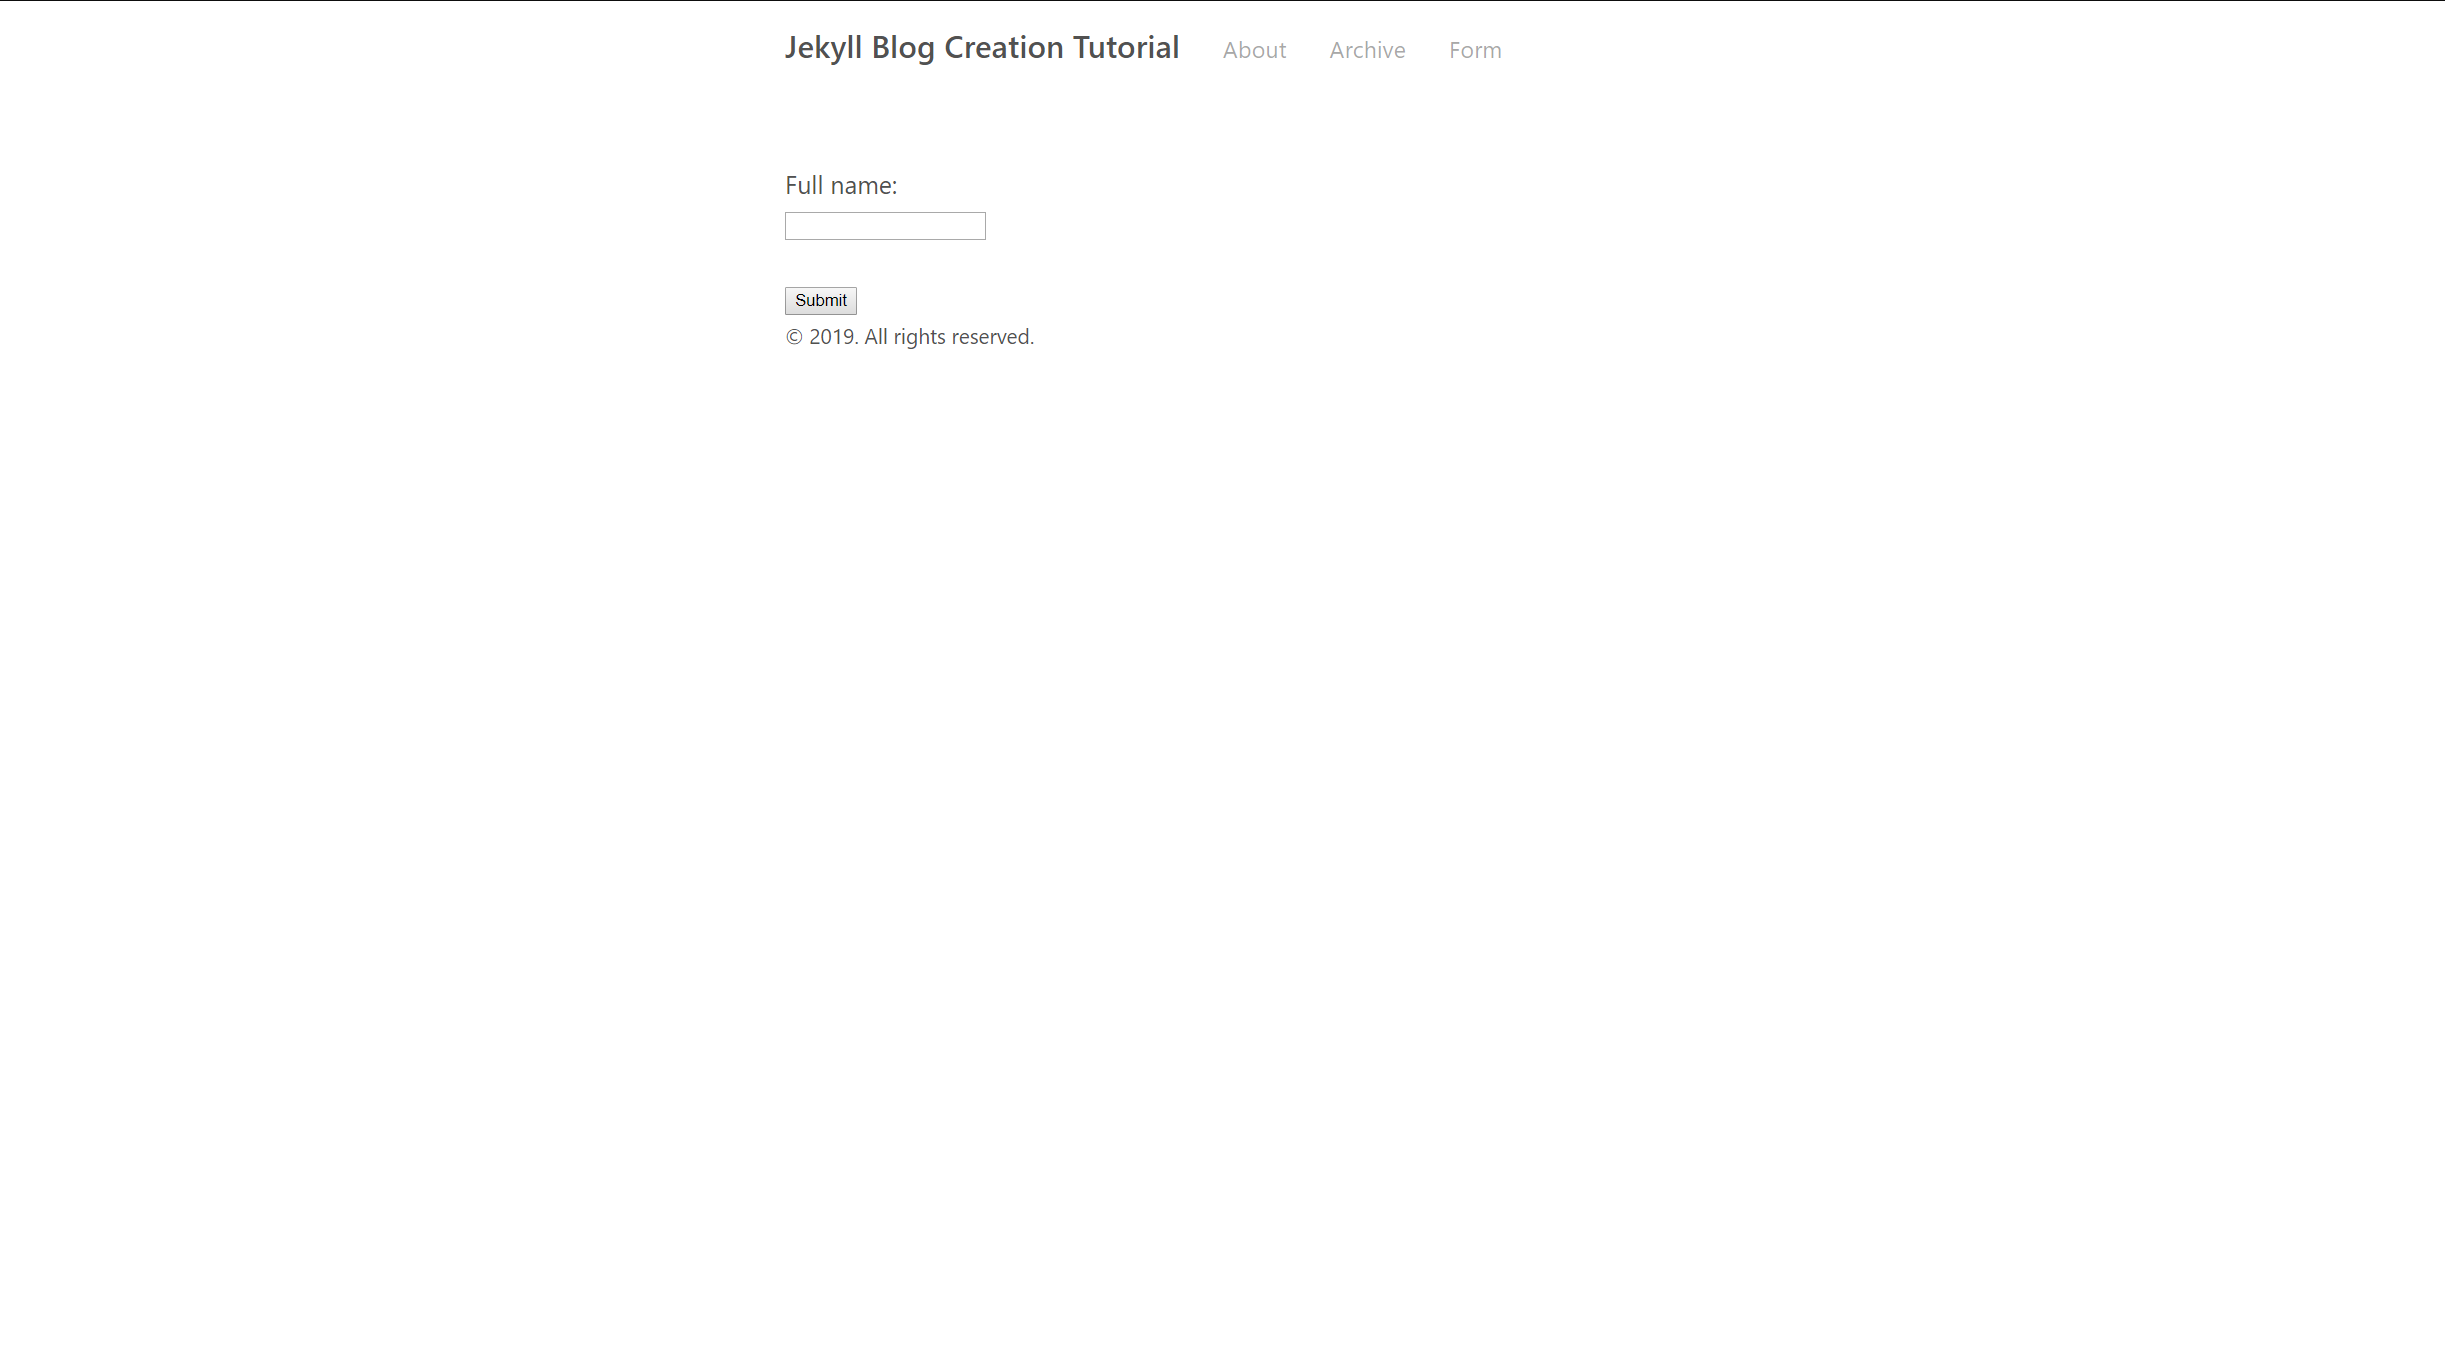
On the first visit, the form is not pre-populated and the submit input says “Submit”:
On the first submission, the the submit input changed to say “submitted”:
On the first revisit, the form is pre-populated with the previously entered data, and the submit input says “Submit”:
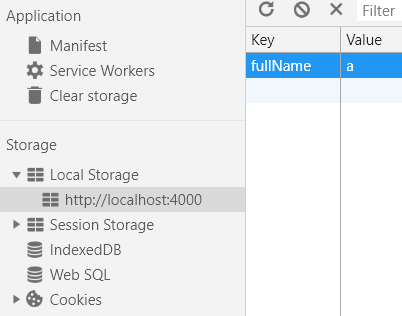
The form’s webpage Local Storage key-value pairs are viewable via Chrome DevTools, e.g., on Google Chrome on Windows, press F12 and navigate as follows:
Applications tab > Local Storage in Storage section > http://localhost:4000/ci347_jekyll_blog_tutorial/form/
Chrome DevTools shows Local Storage key-value pairs as shown below:
The completed Form page created in this part of the tutorial is available here.
References
-
W3Schools (2019). HTML5 Web Storage. [online] Available at:https://www.w3schools.com/html/html5_webstorage.asp [Accessed 2nd Jan. 2019]. ↩
-
Stackoverflow (2019). javascript - Obtain form input fields using jQuery?[online] Available at:https://stackoverflow.com/questions/169506/obtain-form-input-fields-using-jquery [Accessed 2nd Jan. 2019]. ↩